Injection Molding Surface Gloss Defects: Causes and Solutions

Views: 52 Author: Site Editor Publish Time: Origin: Site
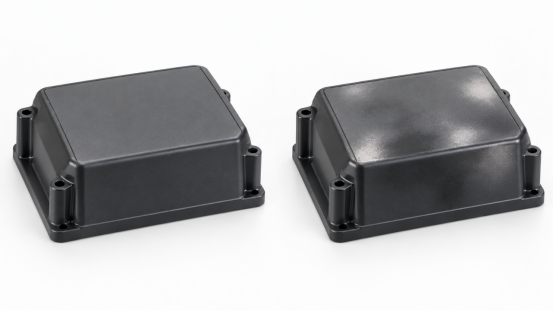
Surface gloss is one of the critical indicators for the appearance quality of injection molded parts. Especially for home appliance housings, automotive trim parts, electronic panels, cosmetic packaging, transparent and semi-transparent products, defects such as uneven gloss, local dullness, bright spots, haze, flow marks, and bright bands near the gate will directly impair product texture. When gloss defects occur in workshops, many operators simply attribute the issue to "insufficient material drying" or "low mold temperature". In fact, the root causes usually involve multiple factors including raw materials, molds, processes, environment and post-processing.
Combined with practical mass-production experience in injection molding, this article systematically analyzes the common surface gloss defects and provides actionable improvement solutions. It helps engineers quickly locate faults and reduce the risk of batch rework.

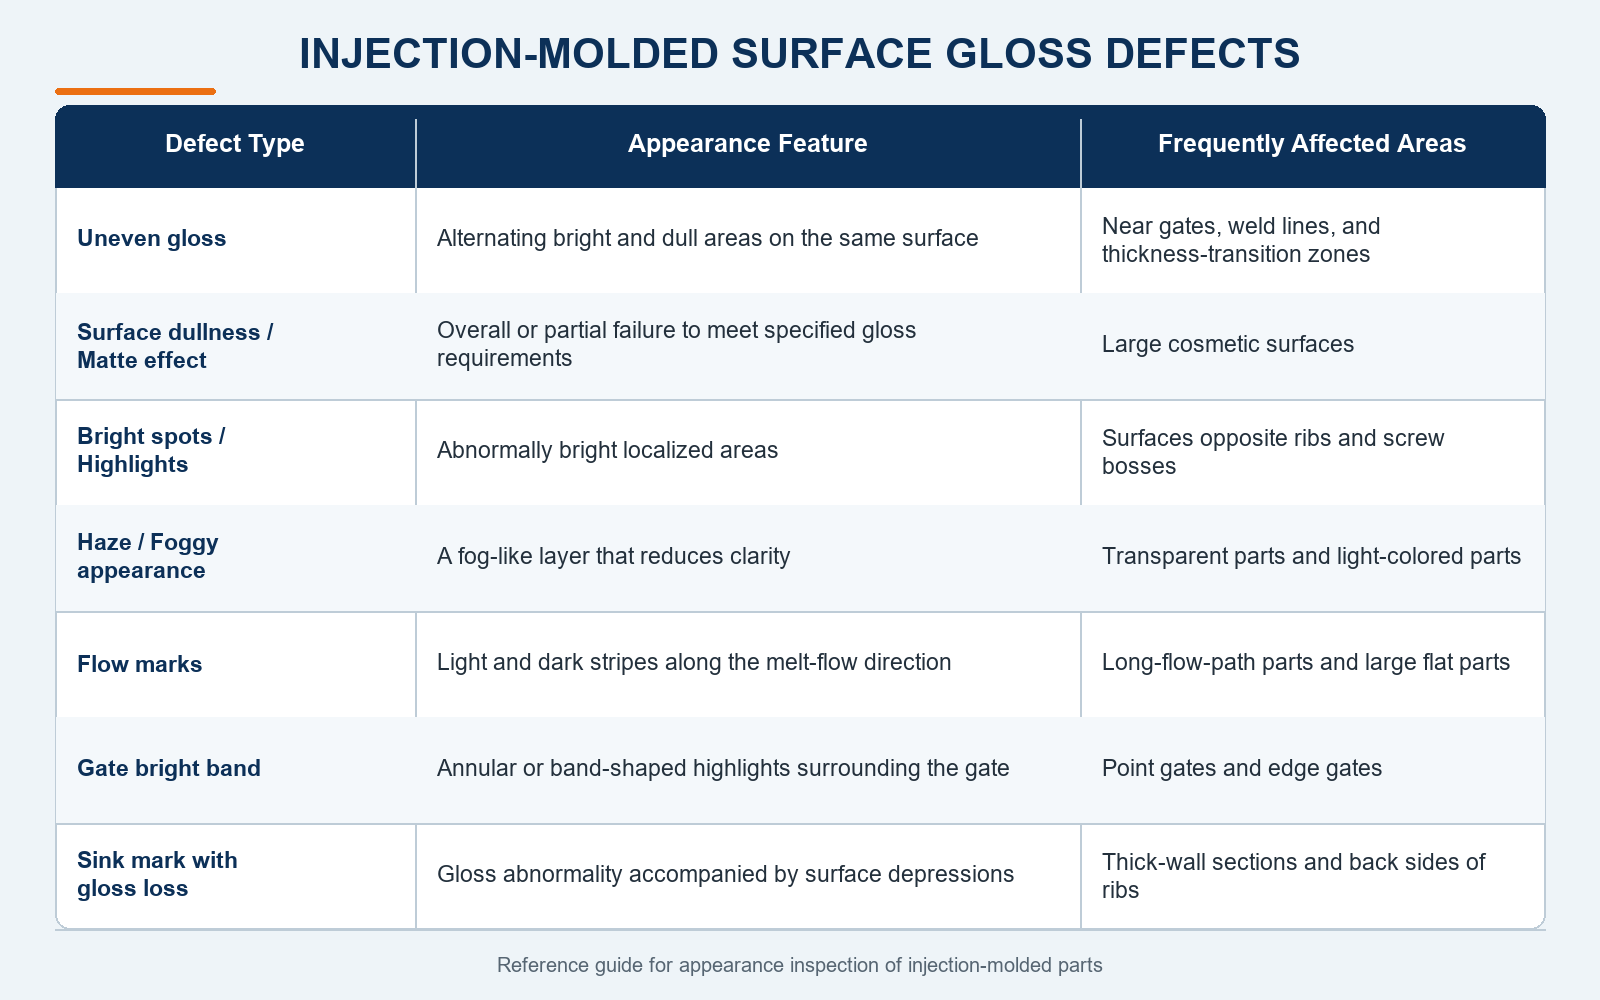
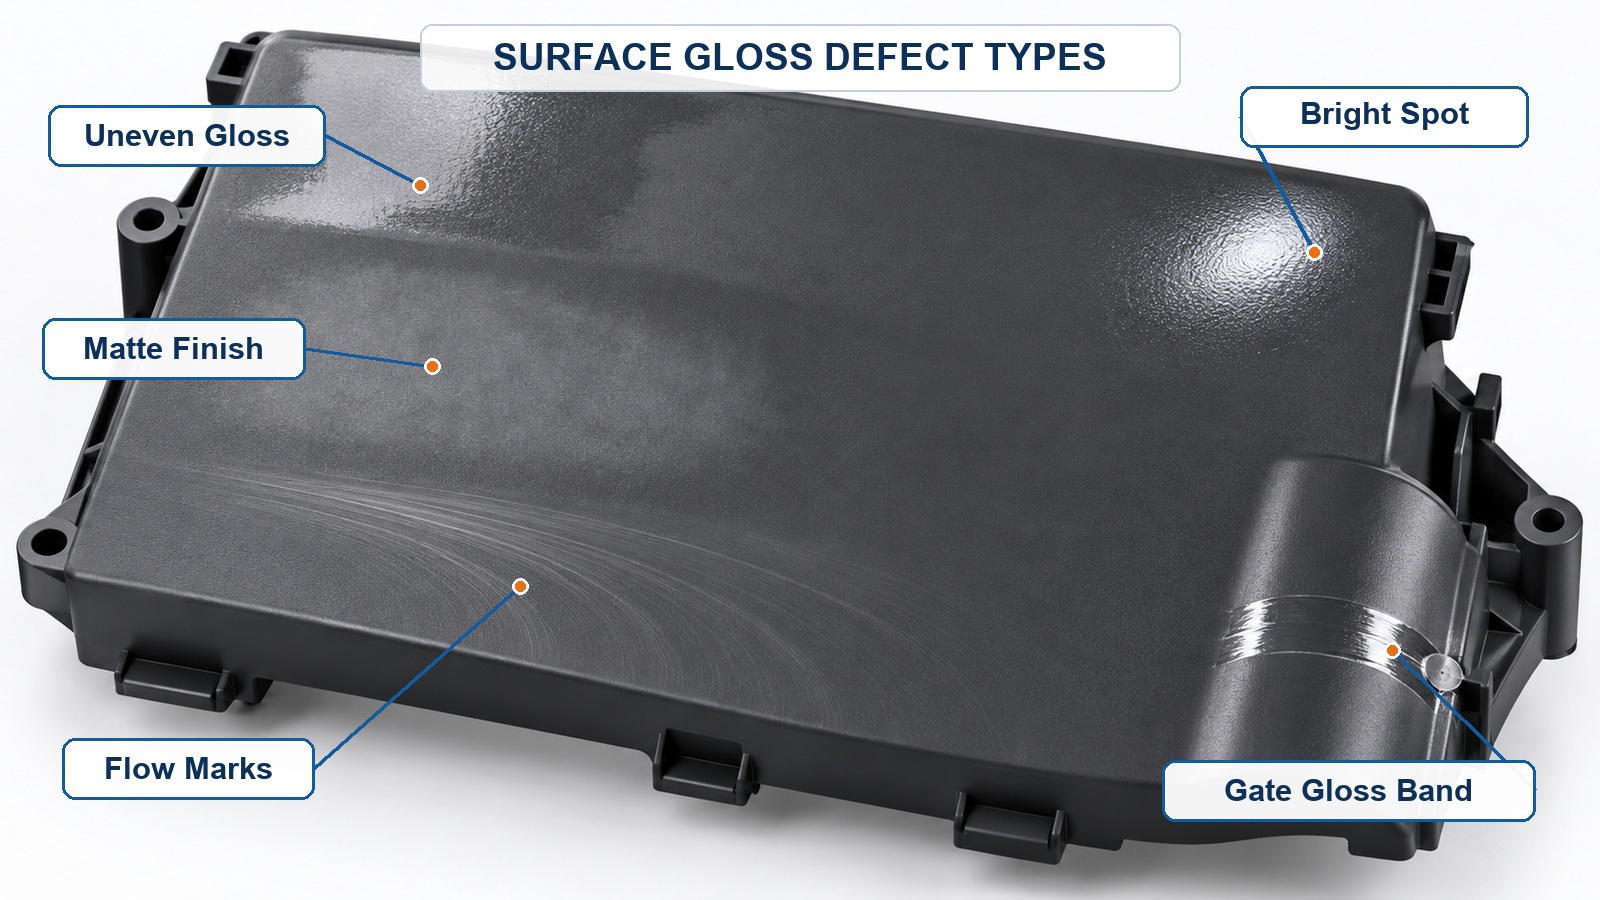
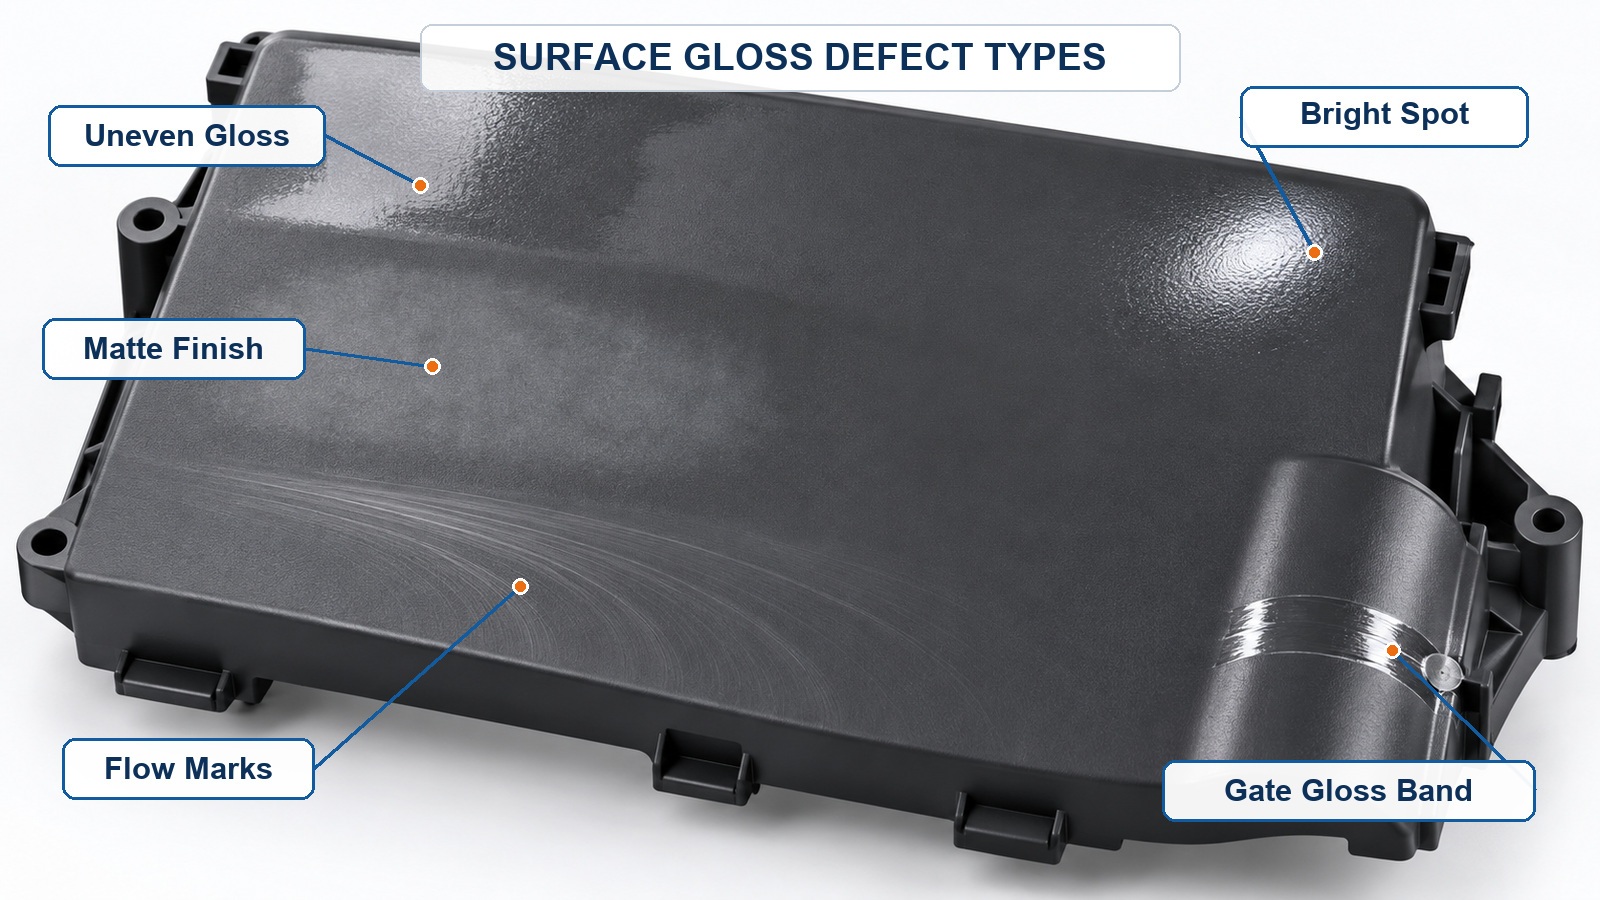
I. Common Types of Surface Gloss Defects


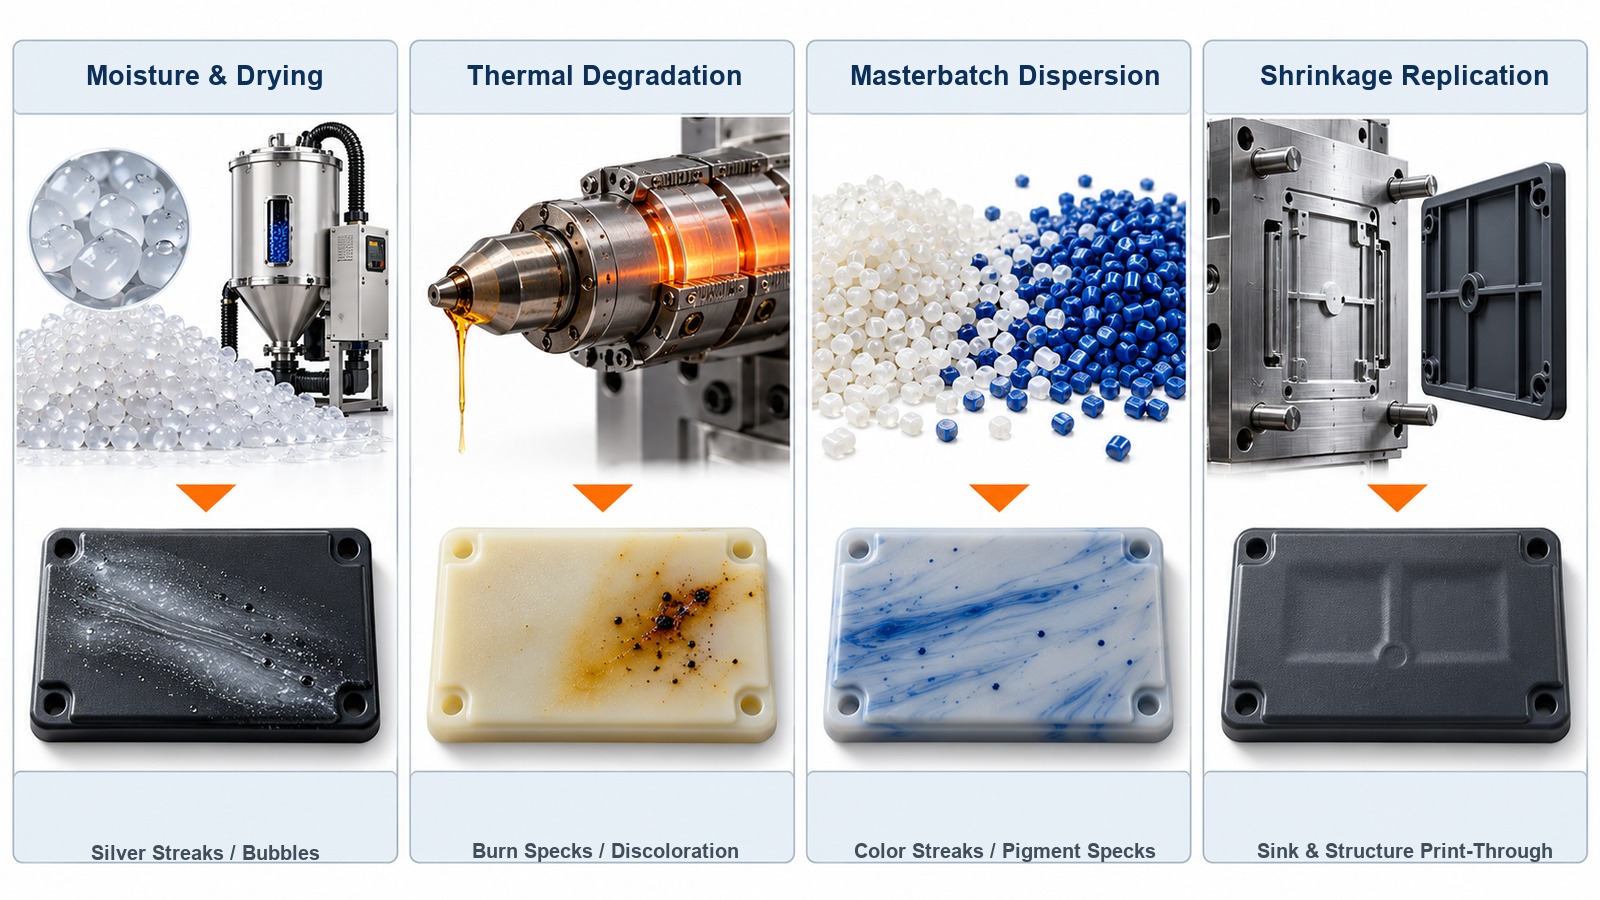
II. Gloss Defects Caused by Raw Materials

1. Moisture absorption or insufficient drying

Materials such as PA, PC, PET, PETG and PMMA absorb moisture. During molding, vaporized moisture tends to form haze, silver streaks, bubbles and local gloss loss on the part surface.
Improvement measures:
  • Dry materials fully in accordance with material specifications;
  • Do not arbitrarily reduce drying temperature or duration;
  • Increase inspection frequency of dehumidifying dryers in humid seasons;
  • Prevent dried pellets from prolonged exposure to ambient air.

2. Thermal degradation or overheating

Excessive barrel temperature and long residence time will trigger thermal degradation of plastics. Mild degradation leads to dullness and yellowing, while severe degradation causes black specks and brittleness.
Improvement measures:
  • Lower barrel temperature, especially the nozzle and front zone temperature;
  • Shorten material residence time inside the barrel;
  • Avoid excessive backpressure and high shear;
  • Clean the barrel regularly to prevent accumulated thermal history.

3. Poor dispersion of fillers, additives and color masterbatch

Uneven dispersion of glass fiber, mineral fillers, color masterbatch and additives results in inconsistent local composition, showing as stripes, mottling, bright spots or gloss loss.
Improvement measures:
  • Verify compatibility between color masterbatch carrier and base resin;
  • Appropriately raise backpressure to enhance mixing;
  • Optimize screw configuration and process parameters;
  • Switch to color masterbatch or additives with better dispersibility.

4. Poor surface replication due to material shrinkage

High shrinkage or insufficient packing pressure prevents the melt from closely attaching to the mold cavity, causing low gloss, sink marks and uneven texture.
Improvement measures:
  • Increase packing pressure and packing time;
  • Optimize injection speed and switchover position;
  • Improve mold venting to avoid gas blocking melt contact with cavity surface;
  • Adjust gate location and runner size if necessary.


III. Gloss Defects Caused by Molds

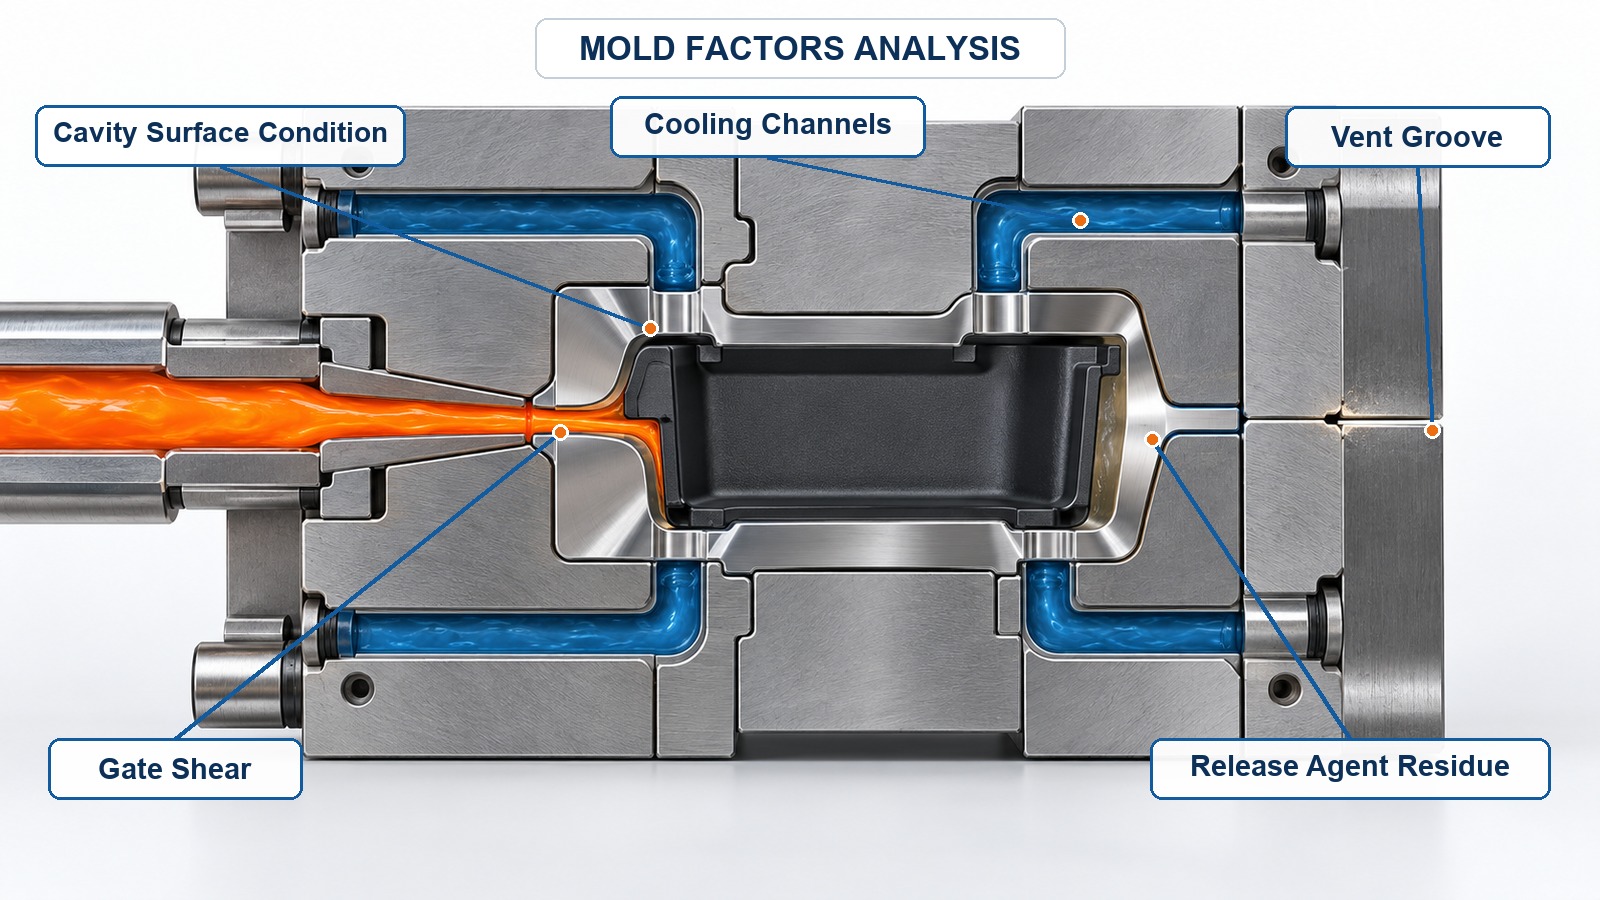
1. Poor cavity surface condition

The surface roughness of the mold cavity directly determines replication quality. Insufficient polishing, inconsistent texture, rust spots, scratches and oil contamination will all be replicated onto molded parts.
Improvement measures:
  • Finish cosmetic surfaces with mirror or textured treatment as required;
  • Inspect cavity surface condition periodically;
  • Clean and apply anti-rust treatment before and after production;
  • Avoid scratching the cavity with hard tools.

2. Improper gate and runner design

Undersized gates and concentrated melt flow create excessive shear heat and form bright bands around gates. Overlong runners cause heavy pressure loss and degrade gloss at the far end of flow path.
Improvement measures:
  • Enlarge gate size appropriately;
  • Optimize gate location to reduce melt impingement on cosmetic surfaces;
  • Shorten runners to minimize pressure drop;
  • Adopt multi-stage injection speed to reduce shear near gates.

3. Poor venting

Trapped gas inside the cavity prevents full contact between melt and cavity surface, triggering local dullness, haze, gas marks and burn marks.
Improvement measures:
  • Add vents at melt end positions, weld lines and thick sections;
  • Check the depth and width of vent slots;
  • Clear carbon deposits and plastic residues inside vents;
  • Reduce injection speed to avoid adiabatic gas compression.

4. Uneven cooling

Uneven mold temperature leads to inconsistent material shrinkage, inducing internal stress and gloss variation.
Improvement measures:
  • Optimize cooling channel layout to minimize mold temperature difference;
  • Check cooling channels for blockage and scaling;
  • Stabilize mold temperature and avoid temperature fluctuation from frequent mold opening/closing;
  • Apply zone temperature control for large flat parts.

5. Improper release agent application

Excessive or incompatible release agent causes oil stains, haze and local gloss loss.
Improvement measures:
  • Minimize the use of release agent whenever possible;
  • Select release agents compatible with the plastic material;
  • Apply thinly and evenly;
  • Clean molds thoroughly to prevent release agent residue buildup.


IV. Gloss Defects Caused by Molding Process

1. Unsuitable injection speed

High injection speed raises shear heat and triggers localized overheating, causing bright spots, gate bright bands and flow marks. Too low speed makes the melt solidify prematurely and leads to insufficient surface replication.
Improvement measures:
  • Use multi-stage injection: fast filling at early stage, slow packing at later stage;
  • Reduce injection speed around the gate;
  • Find a balanced speed window for filling and shear control;
  • Adjust speed switch points according to cosmetic surface layout.

2. Insufficient packing or early switchover

Low packing pressure and short packing time result in material shrinkage. The melt cannot cling tightly to the mold surface, leading to gloss loss and sink marks.
Improvement measures:
  • Increase packing pressure;
  • Extend packing time;
  • Optimize the switch point from injection to packing;
  • Confirm gate freeze-off.

3. Low or unstable mold temperature

Low mold temperature accelerates melt cooling and yields poor surface replication and dull appearance. Fluctuating mold temperature causes gloss inconsistency between batches.
Improvement measures:
  • Raise mold temperature appropriately;
  • Use a mold temperature controller for stable temperature control;
  • Reduce idle waiting time between mold cycles;
  • Guarantee stable cooling water flow and temperature.

4. Too high or too low barrel temperature

Excessive barrel temperature causes degradation, yellowing and dullness. Insufficient barrel temperature reduces melt flowability and creates uneven texture replication.
Improvement measures:
  • Set barrel temperature within the recommended range for the specific resin grade;
  • Prevent overheating at the nozzle;
  • Reduce backpressure and screw speed to cut shear heating;
  • Refer to actual melt temperature instead of only set values.

5. Excessive backpressure and screw speed

High backpressure and high screw speed generate extra shear heat, resulting in local overheating, degradation and abnormal gloss.
Improvement measures:
  • Lower backpressure;
  • Reduce screw rotation speed;
  • Maintain sufficient homogenization while avoiding excessive shear;
  • Strictly control thermal history for heat-sensitive resins.


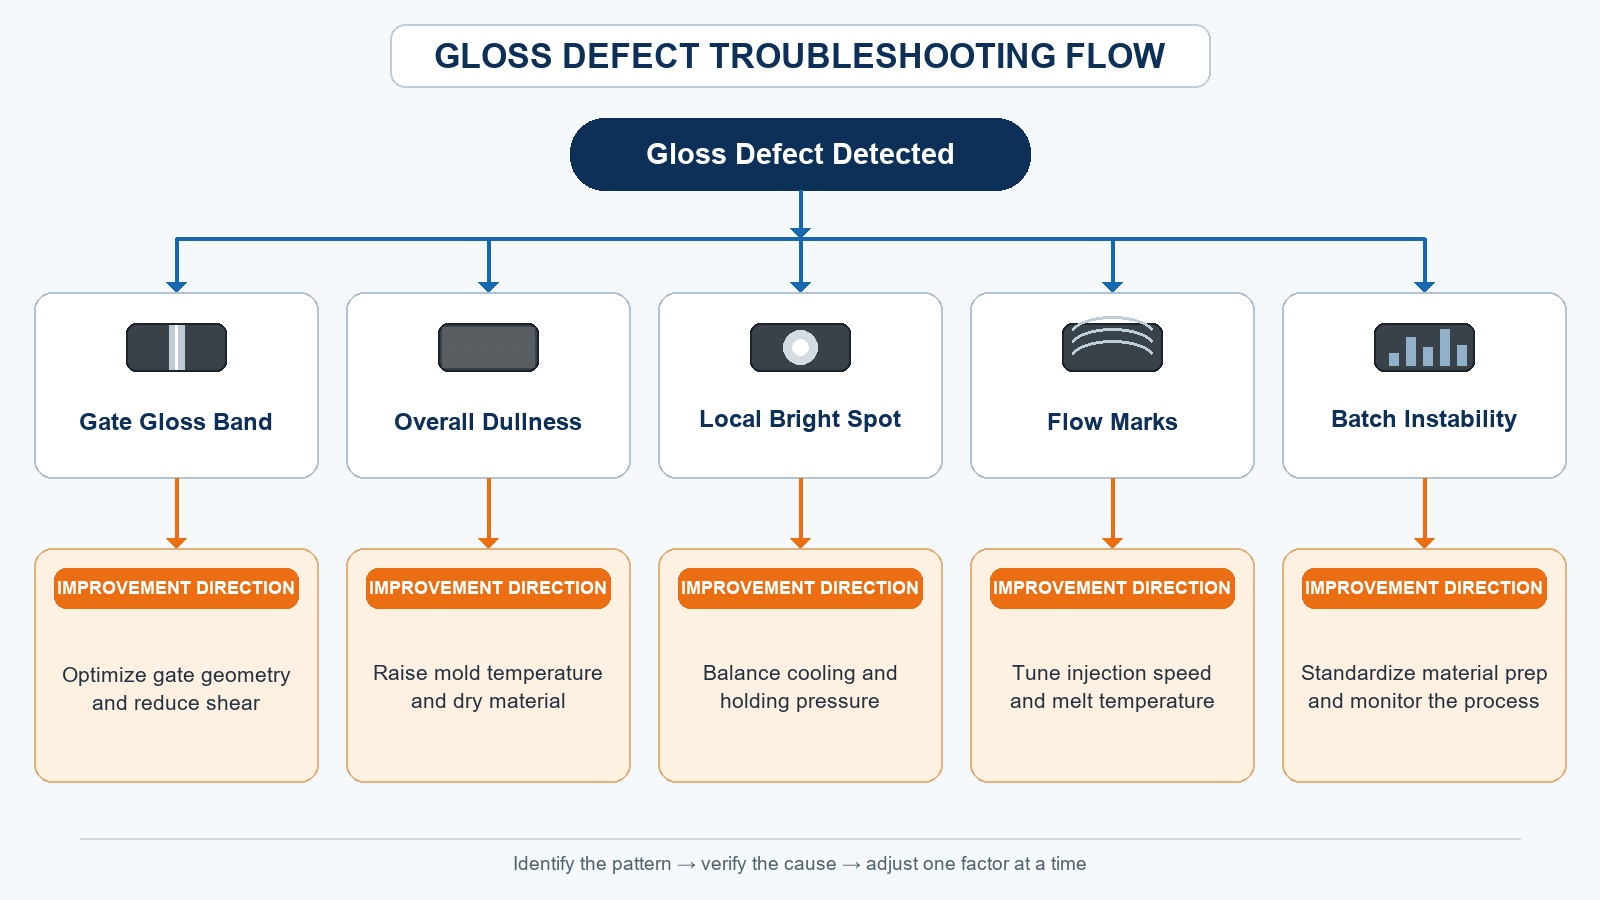
V. Quick Troubleshooting Guide for Common Gloss Defects

Scenario 1: Bright band near the gate

Check points:
  • Is injection speed too high?
  • Is gate size too small?
  • Is nozzle temperature too high?
  • Does the material suffer from shear overheating?
Preferred solutions: Reduce injection speed, enlarge the gate, lower nozzle temperature, optimize multi-stage injection profile.

Scenario 2: Overall dullness or haze

Check points:
  • Is the material fully dried?
  • Is mold temperature too low?
  • Is mold venting inadequate?
  • Is release agent oversprayed?
Preferred solutions: Strengthen drying, raise mold temperature, improve venting, reduce release agent usage.

Scenario 3: Local bright spots

Check points:
  • Do spots correspond to ribs or screw bosses on the opposite side?
  • Is there localized shear overheating?
  • Are sink marks or material accumulation present?
  • Is color masterbatch poorly dispersed?
Preferred solutions: Adjust packing parameters, optimize injection speed, improve venting, inspect color masterbatch dispersion.

Scenario 4: Flow marks or light-dark stripes

Check points:
  • Does melt flow cross cosmetic surfaces?
  • Is injection speed unstable?
  • Is mold temperature evenly distributed?
  • Is gate location poorly designed?
Preferred solutions: Apply multi-speed injection, raise mold temperature, relocate gates, balance runner layout.

Scenario 5: Gloss inconsistency between batches

Check points:
  • Are drying conditions consistent?
  • Does barrel temperature fluctuate?
  • Is mold temperature stable?
  • Are resin batches or color masterbatch ratios changed?
Preferred solutions: Lock process parameters, implement first-article inspection, stabilize raw material and color masterbatch supply.


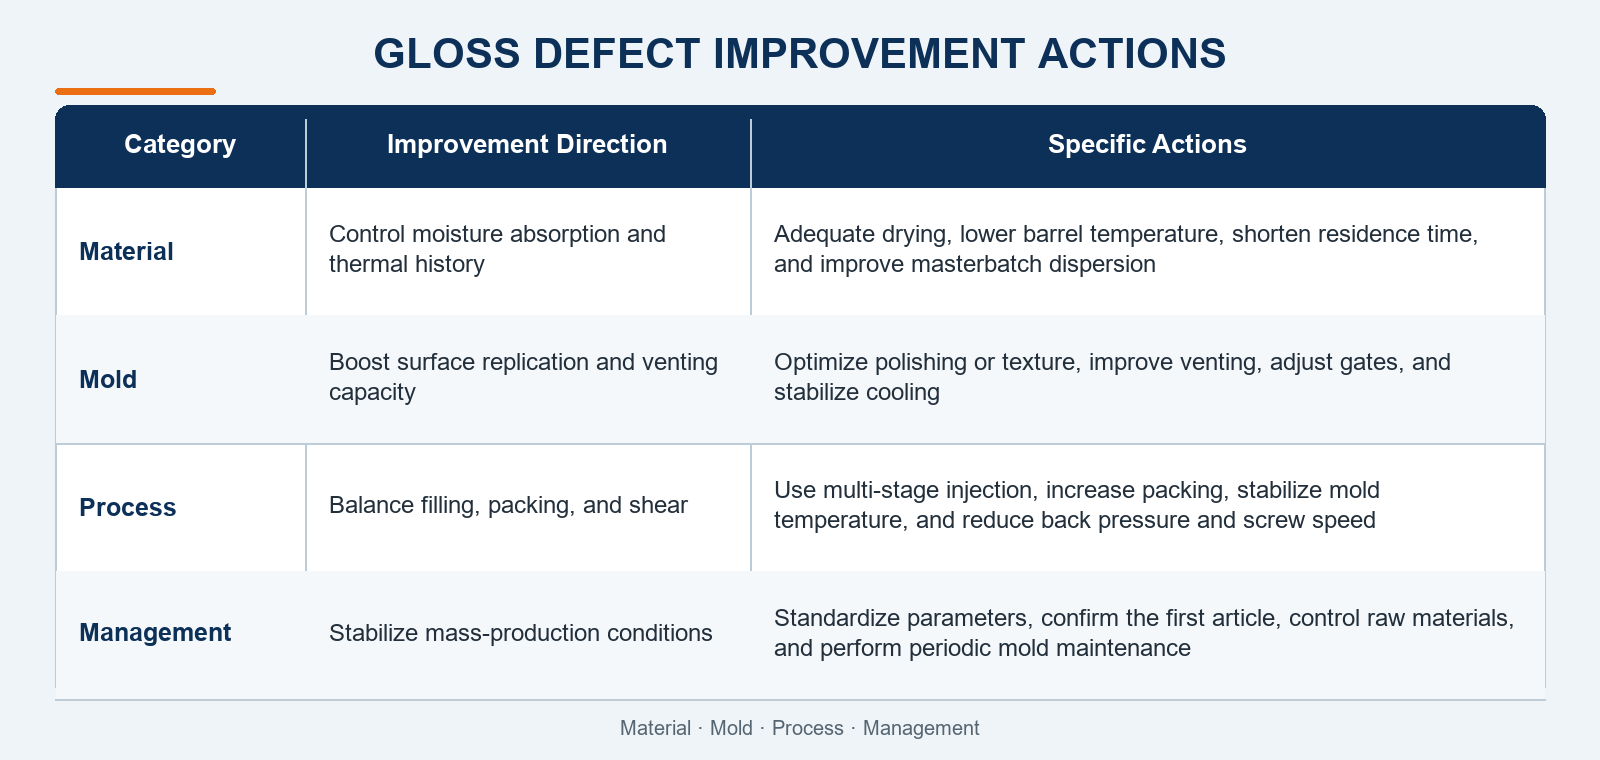
VI. Summary of Comprehensive Solutions

VII. Preventive Recommendations

  1. Evaluate material and mold at the early design stage For parts with strict gloss requirements, confirm material shrinkage, cavity texture, gate layout, venting and cooling plans during material selection and mold review.
  2. Establish standardized process parameter sheets Lock critical parameters including drying condition, barrel temperature, mold temperature, injection speed, packing and backpressure for each product to minimize arbitrary adjustments.
  3. Strengthen first-article inspection Compare the first shot with the approved standard sample before mass production, to confirm gloss, color and texture consistency.
  4. Perform regular mold maintenance Clean cavities, vents and cooling channels periodically to prevent gloss defects caused by oil, carbon deposits and scaling.
  5. Control raw material and color masterbatch batches Conduct trial molding when switching resin grades or masterbatches to avoid gloss variation from batch differences.

Conclusion

Injection molding surface gloss defects are rarely caused by a single factor. They usually arise from a combination of material moisture absorption, mold surface status, venting & cooling performance, process parameters and production management. Troubleshooting should follow the sequence: material drying → mold inspection → process tuning → production stability control , instead of adjusting temperature and pressure blindly and frequently.
For high-gloss cosmetic parts, gate design, venting, cooling and cavity surface finish should be finalized in the mold development phase, and gloss stability must be verified via trial runs. This approach helps reduce batch defects and cut the cost of rework and mold revision.
×

Inquire

*Name
*Email
Company Name
Tel
*Message